How to Do Gel Nail Polish A Step-by-Step Guide
Preparing Your Nails for Gel Polish Application
How to do gel nail polish – Proper nail preparation is crucial for a long-lasting and beautiful gel manicure. Neglecting this step can lead to chipping, lifting, and overall poor results. This section details the essential steps to ensure your nails are perfectly primed for gel polish.
Nail Shaping, Buffing, and Cleaning

Source: fancynailart.com
Before applying any gel polish, it’s vital to prepare the nail plate. This involves shaping, buffing, and thoroughly cleaning the nail surface. This process creates a smooth, even base for optimal adhesion of the gel polish.
- Shape your nails: Use a nail file to achieve your desired shape. Gentle, even strokes are key to prevent damage.
- Buff the nail surface: Lightly buff the nail surface with a fine-grit buffer to remove any ridges or shine. Be gentle to avoid thinning the nail.
- Clean the nail plate: Use a lint-free wipe and nail polish remover to remove any dust or debris from buffing.
Cuticle Care
Proper cuticle care is essential for a clean and neat manicure that lasts. Gently pushing back or removing excess cuticle helps prevent lifting and improves the overall look of your nails. Avoid aggressive cuticle cutting as this can lead to infection.
Using a cuticle pusher, gently push back the cuticles towards the base of the nail. Avoid pulling or ripping the cuticles. For excess cuticle, a cuticle remover can be used. Apply it according to the product instructions, then gently push back the softened cuticle with the pusher. Finally, wipe away any remaining residue with a clean wipe.
Nail File and Buffer Types
Different nail files and buffers serve specific purposes in nail preparation. Choosing the right tools and using them correctly is essential to prevent nail damage.
| Tool Type | Material | Use | Precautions |
|---|---|---|---|
| Nail File | Glass, Metal, Emery Board | Shaping and refining the nail’s edges | Avoid sawing back and forth; file in one direction only. Use a fine-grit file for delicate shaping. |
| Buffer | Fine-grit, Medium-grit, Coarse-grit | Smoothing the nail surface, removing shine | Use gentle pressure to avoid over-buffing and thinning the nail. |
Applying the Base Coat
The base coat is the foundation of your gel manicure. It creates a smooth surface for the color polish to adhere to, preventing staining and promoting longevity. Choosing the right base coat is crucial for compatibility with your gel polish brand.
Base Coat Application
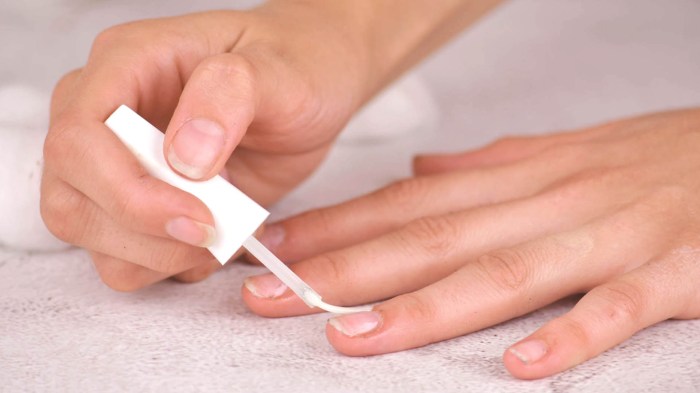
Apply a thin, even layer of base coat to the entire nail, avoiding the cuticles. Use smooth, even strokes from the cuticle area towards the free edge. Let it cure according to the manufacturer’s instructions under a UV or LED lamp.
Types of Base Coats
Sticky base coats leave a tacky layer after curing, providing better adhesion for the color gel polish. Non-sticky base coats cure to a smooth, non-tacky surface. Sticky base coats are generally preferred for better grip, but non-sticky base coats can work well with certain gel polish brands. Experiment to find what works best for you and your chosen brand.
Preventing Base Coat Mistakes
Common base coat application mistakes include flooding the cuticles and leaving streaks. To avoid these, apply thin coats, use smooth strokes, and ensure the base coat doesn’t touch the skin around the nail.
Applying Gel Polish Color
Applying the gel polish color requires precision and a gentle touch to achieve a flawless, even finish. The number of coats and drying time will depend on the opacity of the polish.
Gel Polish Color Application
- Apply a thin coat of color gel polish, avoiding the cuticles. Cure under a UV or LED lamp.
- Apply a second thin coat of color gel polish, ensuring complete coverage. Cure again.
- For more opaque colors, a third thin coat may be necessary. Cure as needed.
Achieving a Smooth Finish
To achieve a smooth, even finish, use thin coats and avoid applying too much pressure with the brush. Apply the polish in smooth, even strokes from the cuticle to the free edge, avoiding back-and-forth movements which may create bubbles or streaks.
Different Application Techniques
Various techniques can be used to achieve different effects with gel polish. Experiment with these to find what suits your style.
| Technique | Steps |
|---|---|
| Ombre | Apply different shades of polish, blending them smoothly at the edges using a sponge or brush. |
| Gradient | Similar to ombre, but with a more gradual transition between colors. |
| French Manicure | Apply a light-colored polish to the entire nail, then a white or contrasting color to the tips. |
Applying the Top Coat: How To Do Gel Nail Polish

Source: wikihow.com
The top coat seals the manicure, protecting the color and adding shine and durability. Choosing the right top coat can enhance the overall look and longevity of your gel manicure.
Importance of Top Coat
The top coat protects the color from chipping and fading, adding a layer of shine and smoothness. It significantly contributes to the longevity of the manicure. A good quality top coat is essential for a long-lasting and beautiful gel manicure.
Types of Top Coats
High-shine top coats provide a glossy finish, while matte top coats create a smooth, non-shiny look. Quick-dry top coats reduce curing time. The choice depends on personal preference and desired effect.
Preventing Top Coat Mistakes
Avoid applying a thick layer of top coat, as this can cause shrinkage and lifting. Apply thin, even coats to prevent bubbles and ensure smooth, even coverage.
Curing and Aftercare
Proper curing and aftercare are essential for maintaining the longevity and health of your gel manicure. This section details the process of curing and provides tips for aftercare.
Curing Process, How to do gel nail polish
Cure your gel polish under a UV or LED lamp according to the manufacturer’s instructions. Typical curing times range from 30 to 60 seconds for LED lamps and 2-3 minutes for UV lamps. Safety precautions include wearing UV-protective eyewear to shield your eyes from the lamp’s rays.
Aftercare
Avoid prolonged exposure to water and harsh chemicals, as these can weaken the bond between the gel polish and your natural nails. Regularly apply cuticle oil to keep your cuticles moisturized and your nails healthy.
Troubleshooting Curing Issues
Incomplete curing can result in a sticky residue or easily removable polish. This often stems from insufficient curing time or a faulty lamp. Sticky residue can sometimes be gently wiped away with a lint-free wipe and alcohol. If the polish is easily removable, re-apply and cure for a longer duration.
Removing Gel Polish
Proper gel polish removal is crucial to prevent damage to your natural nails. Avoid harsh chemicals and aggressive techniques that can weaken or damage the nail plate.
Safe Gel Polish Removal
There are several methods for safely removing gel polish at home. Always prioritize gentle techniques to avoid damaging your natural nails.
- Soaking Method: Soak cotton pads in acetone, place them on your nails, wrap with foil, and let it sit for 10-15 minutes. Gently push off the softened gel polish.
- Filing Method: Carefully file away the gel polish using a fine-grit file. This method requires more time and skill to avoid damaging the natural nail.
Necessary Tools and Materials

Source: nailartgear.com
- Acetone
- Cotton pads
- Aluminum foil
- Orangewood stick or cuticle pusher
- Fine-grit nail file (for filing method)
Helpful Answers
Can I use regular nail polish remover to remove gel polish?
No, regular nail polish remover is ineffective. Gel polish requires acetone-based remover and soaking.
Achieving a professional gel manicure at home involves several key steps, from proper nail preparation to careful application and curing. For vibrant and long-lasting results, consider using high-quality polishes like those offered by clara colors gel nail polish , known for their rich pigmentation and durability. Remember to finish with a top coat for added shine and protection, ensuring your gel manicure lasts for weeks.
Proper aftercare is also crucial for maintaining the longevity of your gel polish.
How long does gel polish last?
With proper application and aftercare, gel polish can last 2-3 weeks.
What if my gel polish is still sticky after curing?
This indicates incomplete curing. Increase curing time or ensure the lamp is functioning correctly.
Is a UV/LED lamp necessary for gel polish?
Yes, a UV or LED lamp is essential to cure and harden the gel polish.


